
A laser level can turn a frustrating Saturday project into a calm, one-person job. Instead of balancing a spirit level while trying to hold a shelf bracket or make tiny pencil marks, you get a horizontal, vertical, or crossed reference that stays on the wall while you work. That is especially useful for first-time DIYers hanging a gallery wall, lining up cabinet hardware, laying a backsplash, or marking a row of floating shelves.
The best DIY laser level is not automatically the one with the most lines, the longest claimed distance, or the most technical mode. For occasional home projects, simple self-leveling controls, a visible indoor beam, and a practical way to mount the tool matter more. A good starter kit should let you open the box, set it on a tripod or bracket, wait for the line to stop blinking, and begin marking.
This guide focuses on ten products supplied for this roundup. We considered their stated beam type, leveling behavior, included accessories, durability claims, and Amazon rating—not price, which changes too often to make a useful comparison. The short version: choose a compact cross-line laser for pictures and shelves; choose a tripod bundle if you do not already own a stable mount; and move to 3×360° planes only when you expect to tackle cabinets, tile, or a room-wide renovation.
Top 3 Best DIY Laser Levels
Motovera 100ft Green Cross-Line with Tripod

- Green cross line, self-leveling and manual modes
- Tripod included for a usable day-one setup
- Four brightness settings and pulse mode
Fanttik D2 Pocket Green Laser Level

- Compact green cross-line design for home jobs
- USB-C rechargeable with a stated 10-hour runtime
- Rotating magnetic bracket and carrying pouch
CIGMAN 3×360° Green Laser Level

- Three 360-degree green planes for room layout
- Rechargeable battery, remote, and rotating magnetic stand
- Useful step up for tile, cabinets, and multi-wall work
Affiliate Disclosure: As an Amazon Associate we earn from qualifying purchases. We earn a commission, at no additional cost to you.
10 Best Laser Levels for DIY Compared
This is a no-price comparison because listings and bundles change. Use it to identify the kind of tool you need, then verify the live listing for the exact accessories, battery, and compatible receiver before ordering.
- Green cross line; stated 100 ft indoor
- Self-level, manual, and pulse modes
- Tripod and carrying case included
- Green cross line; stated 100 ft
- Self-level, manual, and pulse modes
- Magnetic bracket included
- Green cross line; stated 100 ft
- USB-C rechargeable; stated 10-hour runtime
- Rotating magnetic bracket and pouch
- Laser line with bubble vials
- Horizontal, vertical, and cross settings
- Built-in 8 ft / 2.5 m tape
- Red cross line; stated 50 ft
- Self-leveling smart pendulum
- IP55 body and integrated magnetic mount
- Green cross line; stated 100 ft
- Self-leveling within 3.5 degrees
- Aluminum tripod, pouch, and battery
- Green horizontal and vertical lines
- Self-leveling within 3.5 degrees
- AA battery, pouch, and IP54 rating
- Three 360-degree green planes
- Rechargeable battery and remote
- Magnetic rotating stand; IP54 body
- Red horizontal, vertical, and cross lines
- Self-leveling and manual modes
- Rotatable body, pouch, and battery
- Green cross line; stated 100 ft
- Manual, self-level, and pulse modes
- 25.6-inch tripod and three brightness settings
We earn a commission, at no additional cost to you.
Detailed Product Reviews
1. Motovera 100ft Green Cross-Line
The Motovera makes the strongest case for being a beginner's first laser because it tackles the boring but important part of getting started: where to put the tool. The included aluminum tripod means a renter can set a line at shelf.
- Green cross line; stated 100 ft indoor visibility
- Self-leveling, manual, and pulse modes
- Four brightness settings
- Aluminum tripod and carrying case
- IP54 dust and splash resistance
- A real starter bundle, not just a bare tool
- Green beam suits brighter rooms
- Simple pendulum-style leveling behavior
- Tripod solves common mounting problems
- Brightness control can preserve battery
- Cross-line tool, not full-room 360-degree planes
- Light-duty tripod needs a careful setup
- Receiver is not the same as a receiver-ready mode
Its green cross line is the right format for a typical weekend list. Turn on the horizontal line for a run of frames, use the vertical line to center a mirror, or use the.
Four brightness settings are unusually thoughtful for this category. A dimmer line can be enough in a shaded room and may be easier on power, while a brighter setting helps near a window. The supplied pulse mode.
The tradeoff is scope. You will reposition a cross-line level when you move from one wall to another, and the included tripod is a convenience accessory rather than a survey stand. Still, for pictures, shelves, a small backsplash, or the first round of.
Who should buy the Motovera kit?
Choose it if your first priority is a green cross-line laser plus an included tripod. It is a more sensible first purchase than a complicated 3×360° model when your projects are still mostly walls, shelves, and decor.
We earn a commission, at no additional cost to you.
2. Cigman 100ft Line Laser

A first laser level should make its behavior understandable, and the Cigman does a good job spelling out the difference between its modes. Slide the pendulum open and the tool self-levels; leave it locked and long-press the button for an.
- Green cross line; stated 100 ft
- Self-leveling, manual, and pulse modes
- Magnetic bracket included
- Stated self-level range of ±4 degrees
- Receiver use supported in pulse mode
- Clear distinction between self-level and manual use
- Magnetic bracket adds mounting flexibility
- Green beam for indoor visibility
- Good fit for picture hanging and tile starts
- Out-of-level blinking gives useful feedback
- No tripod in the supplied description
- Pulse mode needs a separately compatible receiver
- A cross line still needs repositioning for larger rooms
The green cross line is intended for common indoor jobs: a picture row, a pair of floating shelves, a straight tile starter line, or a centered TV mount. The stated 100-foot range is more than most homes require, but the useful reality is.
Its magnetic bracket is the differentiator. On metal shelving, steel framing, or a suitable metal mounting surface, it lets you aim the line without touching the level itself. In a finished house with no metal nearby, you may.
The manual and pulse features give this modest laser room to grow. Manual mode is for a stair rail or an intentionally sloped design, not for pretending the laser is level. Pulse mode is paired.
A useful first-project habit
Set the Cigman on its mount, unlock the pendulum, wait for a solid rather than flashing line, then make small pencil marks. Do not move the bracket between marks; the stability of the mount is just as important as the laser.
We earn a commission, at no additional cost to you.
3. Fanttik D2 Pocket
The Fanttik D2 is the laser to choose when you want to stop using a bubble level for household tasks but do not want another bulky case in the garage. At 0.56 pound according to the supplied information, it is genuinely.
- Green cross line; stated 100 ft
- 2200 mAh rechargeable battery; stated 10-hour runtime
- USB-C charging
- 360-degree rotating magnetic bracket
- Pulse mode and carrying pouch
- Tiny, approachable form factor
- USB-C charging avoids disposable batteries
- Rotating bracket helps with fine aiming
- Long stated runtime for a compact tool
- High 4.6 supplied rating
- No tripod described in the kit
- Cross lines cannot replace 360-degree planes
- Small body is easier to bump on an unstable surface
Its 2200 mAh internal battery and USB-C charging are especially friendly for casual owners. Charge it after a project, keep the cable nearby, and the stated ten-hour runtime should cover several small jobs. There is no hunt for AA cells before guests.
The included magnetic bracket rotates through 360 degrees, so you can establish a level line and then turn the body to chase a vertical reference without rebuilding the whole setup. It is a clever convenience for.
This is not the answer for a full bathroom tile layout or a kitchen where you need lines across multiple planes. It is a bright, rechargeable cross-line tool aimed at repeated small wins. For home DIYers who value storage, chargeability, and low.
Why portability matters
A smaller laser is not less serious; it is more likely to be on hand when a project needs it. Use the D2 for reference lines, but let the mount settle and avoid placing it on a springy ladder shelf or a stack of books.
We earn a commission, at no additional cost to you.
4. AikTryee Line Tool
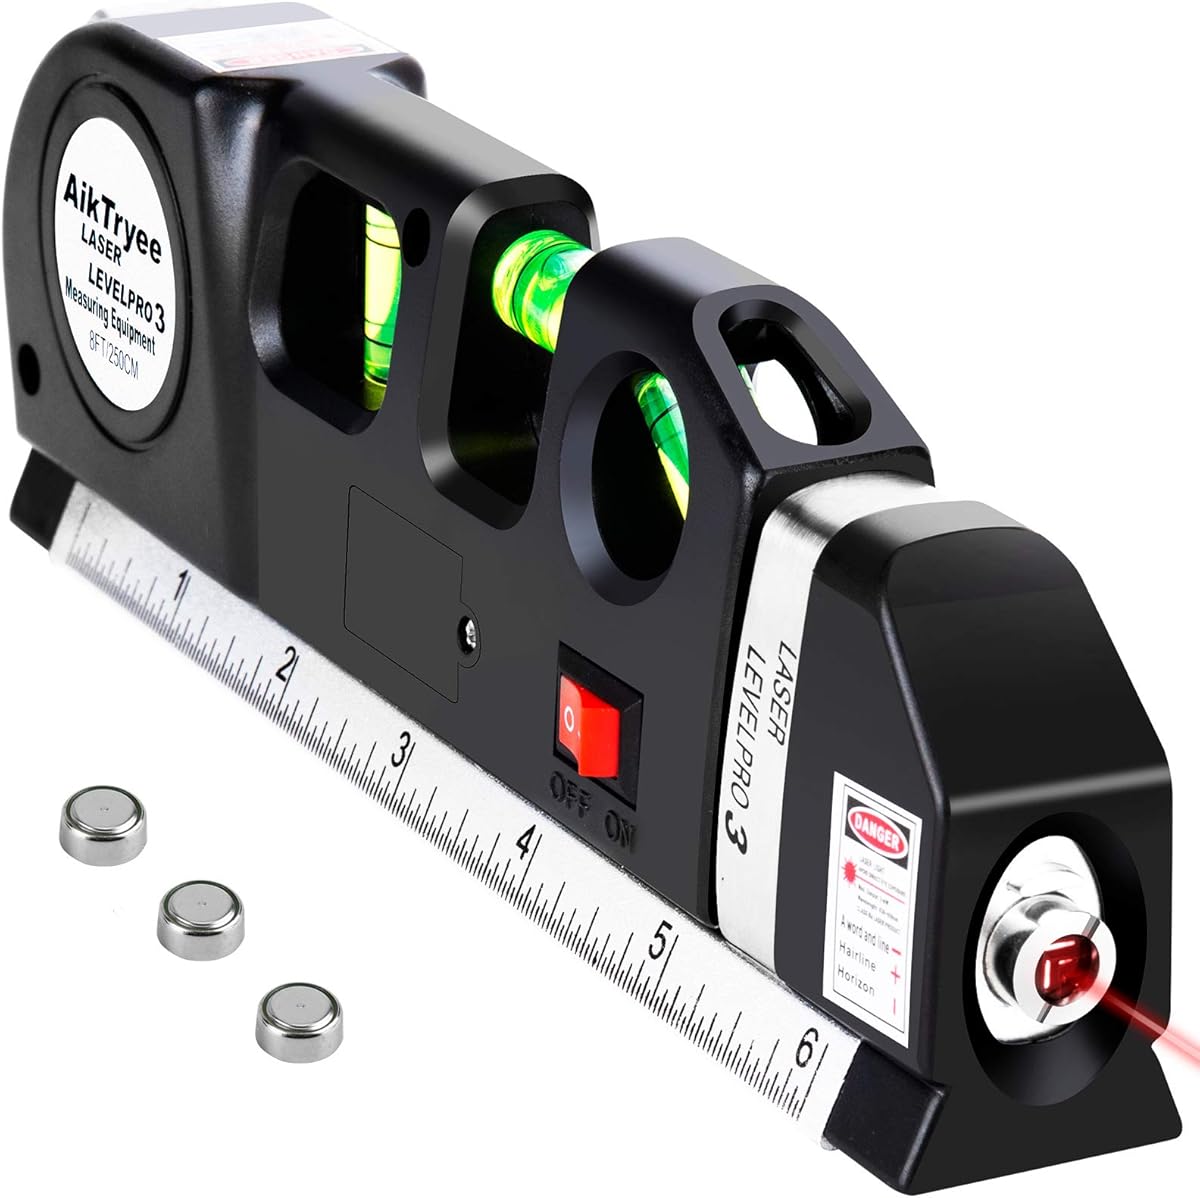
The AikTryee is not a self-leveling laser, and that distinction is important. It is best understood as a traditional multipurpose level with a projected line, bubble vials, and a built-in tape measure. For someone who finds modern laser modes intimidating, that may actually be.
- Laser horizontal, vertical, and cross settings
- Bubble vials at 0, 90, and 45 degrees
- Built-in 8 ft / 2.5 m tape measure
- Metric and imperial markings
- Slider-style mode selection
- Very familiar, low-tech operation
- Tape measure and bubbles are built in
- Useful for a single picture or small frame
- One slider chooses the laser line
- No self-leveling behavior to interpret
- You must manually level it
- Not the precision choice for long runs
- No tripod or magnetic bracket listed
It is a reasonable tool for small, close-range work such as placing a single frame, checking a cabinet face, or marking a short shelf. The eight-foot tape means you can measure and align.
The limitation is that your hands become part of the leveling system. With a self-leveling laser, the pendulum corrects a small tilt and warns you when it cannot. With this tool, you must watch.
Buy this one for occasional micro-projects and familiar controls, not because it is a substitute for a green self-leveling cross-line level. Its value is consolidation: laser guide, bubbles, ruler, and tape in one small object. If your.
Manual-leveling check
Before marking, center the relevant bubble, keep the unit still, and verify the line at a second point. This is the product in this guide where a slow, deliberate setup makes the biggest difference.
We earn a commission, at no additional cost to you.
5. Bosch GLL50-20
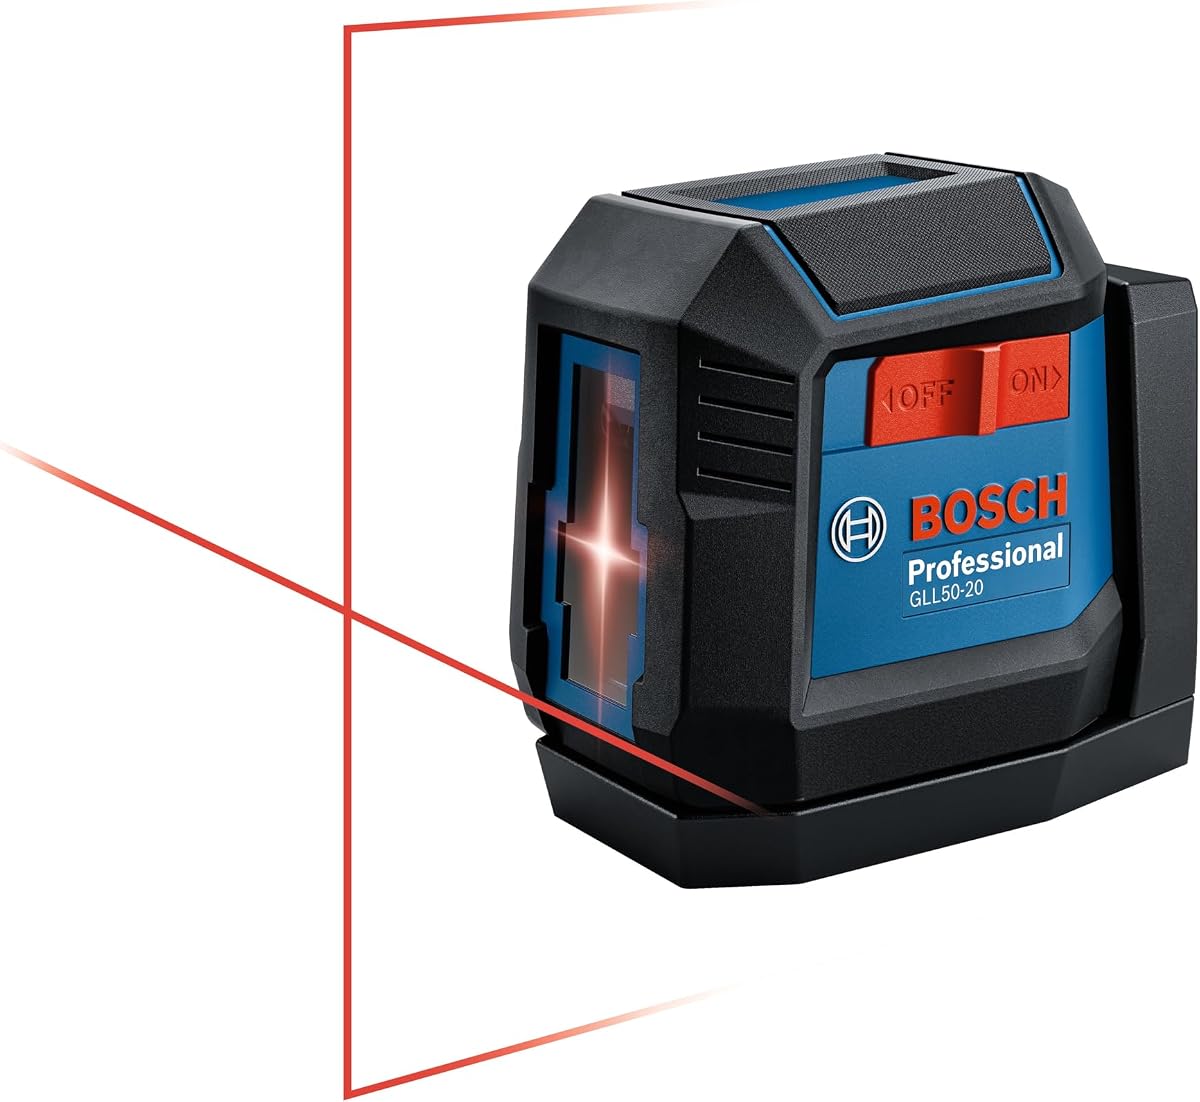
Bosch takes a different route from the feature-heavy green starter kits. The GLL50-20 is a compact red cross-line laser built around a clear pendulum system, an integrated magnetic mount, and IP55 protection. That makes it.
- Red cross-line laser; stated 50 ft
- Self-leveling smart pendulum with lock
- Integrated magnetic mount
- IP55 dust and water resistance
- Two AA batteries included; optional Bosch Li-ion battery
- Rugged IP55 rating for messy repairs
- AA batteries are easy to replace
- Integrated magnetic mount
- Simple self-leveling pendulum system
- Known tool-brand support ecosystem
- Red line is less visible in bright rooms than green
- Shorter stated range than 100 ft options
- No tripod in the listed bundle
The stated 50-foot range is plenty for many rooms, but the red beam deserves an honest caveat: it can be harder to see in a sunlit kitchen or against a light-colored wall than a green beam. That does not.
Its power flexibility is practical. Two included AA batteries get you started, and AA replacements are available almost anywhere. That is reassuring for infrequent owners who do not want to remember to charge a battery months before a project. The pendulum locks during transport.
Choose the Bosch when build confidence and serviceability rank above the brightest possible line. It is an especially sensible fit for DIYers who prefer a proven, simple cross-line laser and regularly work in spaces where.
Red beam versus green beam
Beam color affects visibility, not whether a tool is capable of producing a level reference. If you work in bright rooms, green is normally easier to see. If durability and replaceable AA power are your priorities, the Bosch tradeoff can be worthwhile.
We earn a commission, at no additional cost to you.
6. Nikotek Green Laser with Tripod

The Nikotek with tripod is a strong alternative when the first project is in an open room and you need the laser at a consistent height. The included aluminum tripod is the main story. A.
- Green horizontal and vertical cross line
- Stated 100 ft range and 110-degree projection
- Self-leveling within 3.5 degrees
- Aluminum tripod, battery, and pouch
- IP54 dust, water, and shock resistance claim
- Tripod is included
- Side switch is approachable
- Green beam covers a wide angle
- Battery and pouch complete the basic kit
- 1/4-inch thread supports other tripods
- Tripod is lightweight rather than heavy-duty
- No stated pulse mode in the supplied details
- Not a substitute for a 360-degree layout laser
The core tool is uncomplicated: slide the side switch, project horizontal and vertical green lines, and let the pendulum self-level within its stated 3.5-degree range. When it flashes continuously, reposition the tripod instead of trying to compensate with your marks.
Its stated 110-degree projection angle is helpful at close range because the line can cover a broad portion of a wall. The bottom 1/4-inch screw hole also matters after the included tripod has served its purpose; it keeps the laser.
The caveat is stability. Light tripods are convenient to carry, but they do not like a bumped floor, a loose leg clamp, or an enthusiastic pet passing by. Spread the legs fully, press them into a solid surface, and do.
Getting the most from a light tripod
Set the tripod before switching on the laser. Check every leg lock, avoid carpet that compresses as you move, and mark lightly without touching the pole or center column.
We earn a commission, at no additional cost to you.
7. Nikotek Green Line Laser
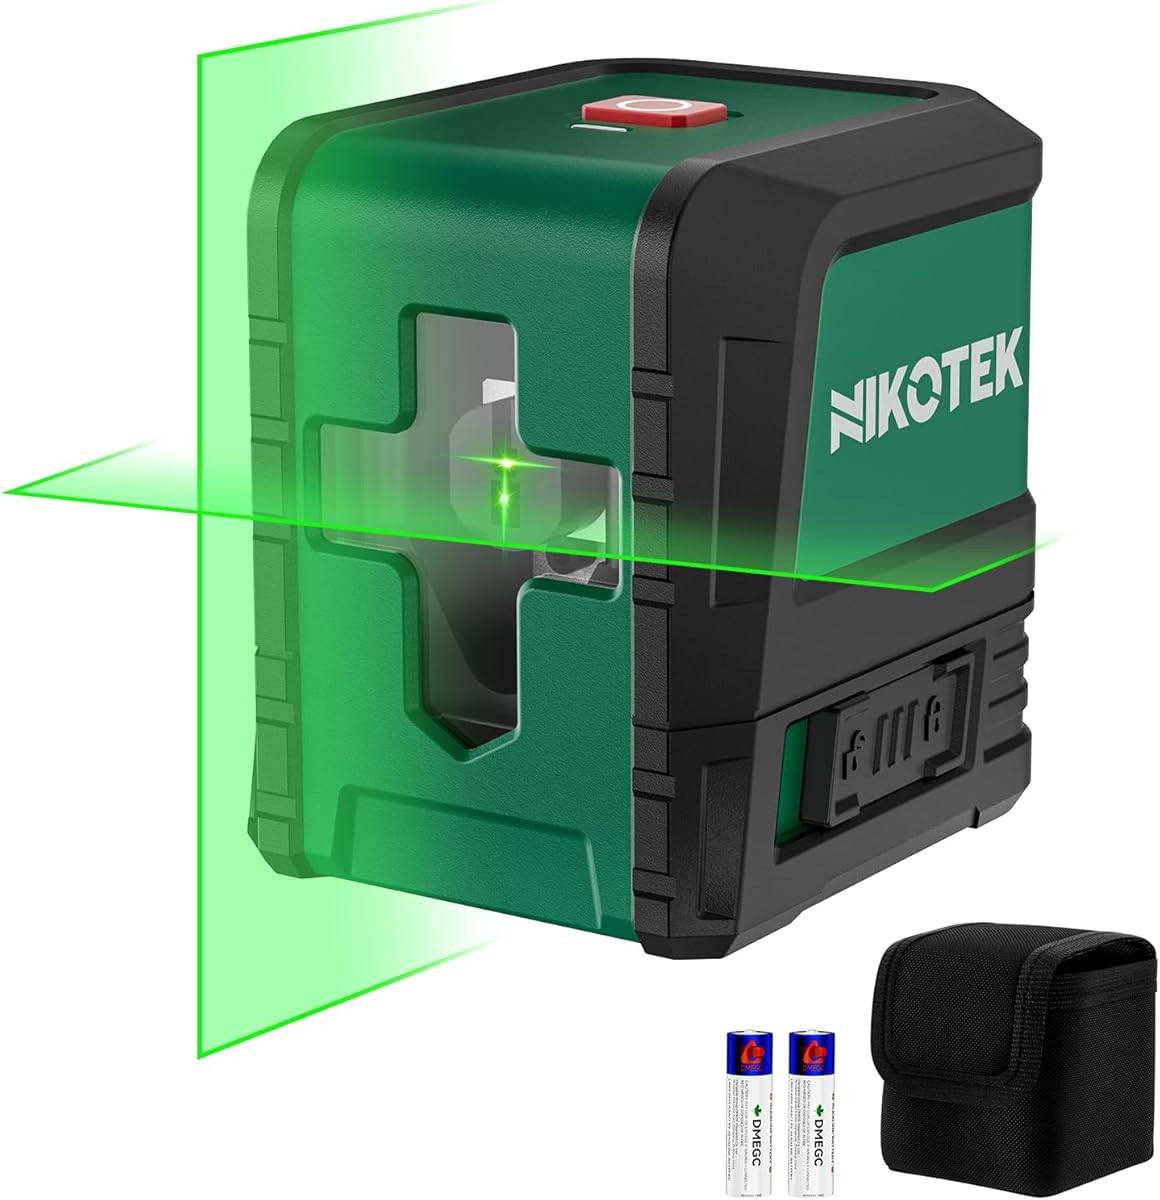
This Nikotek is the stripped-back sibling to the tripod kit above. It keeps the useful part for ordinary DIY—the green horizontal and vertical cross line—and leaves the stand decision to you. That can be exactly right if you already own a camera tripod.
- Green horizontal and vertical lines
- Self-leveling within 3.5 degrees
- Two AA batteries; stated six-hour continuous use
- IP54 dust, water, and shock resistance claim
- Pouch and 1/4-inch mounting thread
- Fewer parts to charge or manage
- AA batteries are convenient
- Green cross line for basic alignment
- Compact, palm-sized body
- Good option for owners of existing mounts
- No tripod included
- No listed pulse or receiver mode
- The kit is focused on basic cross-line jobs
AA batteries are a quiet advantage for a laser that might sit in a drawer between projects. The supplied information claims up to six hours of continuous use, and replacing two batteries is simpler than discovering an internal pack is empty on.
For picture hanging, the workflow is uncomplicated. Mount it, unlock it, allow the cross to stabilize, and use the horizontal beam as a shared baseline. The vertical beam is handy for centering artwork over a sofa or finding a clean line for two.
Do not buy the bare Nikotek just because it seems simpler if you do not own a place to set it. A laser is only as useful as its support. But if you do have a solid 1/4-inch tripod or regularly work from a.
Bare tool or bundled kit?
A bare tool can be the better buy only when you already own a stable mounting option. If you do not, the apparent savings can disappear when you add a tripod later.
We earn a commission, at no additional cost to you.
8. CIGMAN 3×360°
The CIGMAN is the point where a laser level becomes a layout system rather than a convenience tool. Three full 360-degree green planes let you carry a reference around walls, across a floor, and toward a ceiling without.
- Three 360-degree green laser planes / 12 lines
- Self-level, manual, and pulse modes
- Rechargeable battery and remote control
- Magnetic rotating stand
- IP54-rated compact body
- Three planes reduce repositioning around a room
- Remote is useful once the level is mounted
- Rechargeable battery and stand are included
- Strong feature set for renovation layout
- Great fit for cabinets and tile planning
- More controls than a beginner may need
- Receiver needed for serious bright-light work
- A 3×360° tool costs effort to learn and verify
The remote control and rotating magnetic stand are not merely bonus items. Once the tool is mounted across the room, being able to change line visibility without disturbing it can save a surprising amount of.
This is still a tool that benefits from beginner discipline. Start by selecting only the plane you need rather than illuminating the whole room. Confirm the tool is self-leveled before trusting any line. Then establish a physical reference with a tape measure at.
CIGMAN earns the Best DIY Upgrade badge because it makes sense after your project list grows beyond pictures and shelves. Its 4.6 supplied rating and rich accessory set make it tempting as a first buy, but the.
When 3×360° earns its place
Buy a three-plane model when you regularly need a level reference on more than one wall, a floor line for tile, or a ceiling line for cabinets and trim. Otherwise, a cross line is faster to understand and set up.
We earn a commission, at no additional cost to you.
9. RockSeed LV1
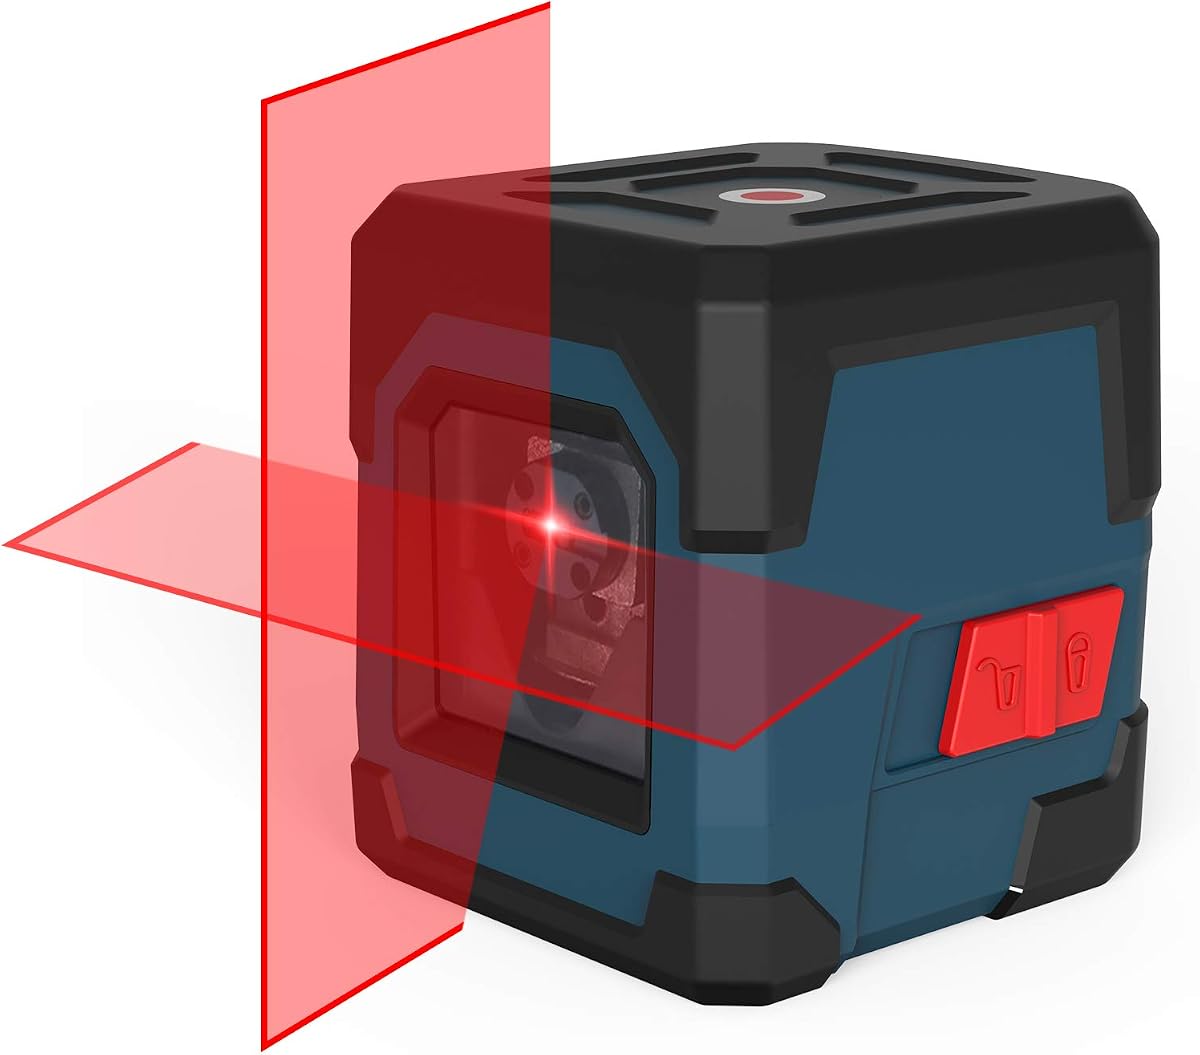
The RockSeed LV1 is a conventional red cross-line laser with a useful split personality: self-leveling for ordinary work and manual mode for intentional angles. That makes it a good teaching tool for someone who wants to understand what a laser is doing rather than.
- Red horizontal, vertical, and cross-line projection
- Self-leveling range stated as 4° ±1°
- Manual mode for intentional angles
- 110-degree projection angle
- Pouch, battery, and rotatable body
- Straightforward self-level and manual switch
- Red laser may use less power
- Rotatable body helps aim the line
- Pouch and battery are listed
- Useful for indoor controlled-light tasks
- Red is less conspicuous in bright rooms
- No tripod included
- Not designed to cover a whole room at once
A red beam is the central compromise. In a dim hallway, finished basement, or evening project, it can be perfectly practical. In a bright white kitchen with direct daylight, you may have to reduce ambient light or work closer to the surface. A green.
The LV1's rotatable body and 110-degree projection are useful for aiming. You can position the laser, establish a stable level line, then adjust the direction without moving your base. Keep in mind that rotation does not make it a 360-degree.
Consider the RockSeed if you want a basic self-leveling cross-line laser for straightforward indoor alignment and do not mind providing your own tripod or elevated surface. It is not the best DIY laser level.
Using the manual mode safely
Manual mode is useful for a stair rail, diagonal wall treatment, or any planned slope. A flashing line in this mode is a reminder that it is not a level reference—measure and mark intentionally.
We earn a commission, at no additional cost to you.
10. Motover Green Laser with Tripod

Motover's tripod bundle is another complete route into green cross-line leveling, with a feature that can matter in mixed lighting: three stated brightness levels. That lets you avoid always running the brightest beam when you are marking a closet or a dim.
- Green cross line; stated 100 ft indoor range
- Manual, self-leveling, and pulse modes
- Three adjustable brightness settings
- 25.6-inch tripod with three-way pan head
- IP54 rating; stated ±3 mm at 10 m accuracy
- Tripod and battery are included
- Brightness choices offer useful flexibility
- Green cross line is visible indoors
- Pan head helps place the beam
- Manual mode supports intentional angles
- Supplied rating is lower than several picks here
- Short tripod may not reach every wall height
- Pulse mode still requires a compatible receiver
The 25.6-inch tripod has a three-way pan head, which is more useful than a fixed mini stand when you need to set a line along a wall. It folds for storage and its adjustable.
The tool offers self-leveling, manual, and pulse modes. Use them in that order of complexity: self-level for almost every normal hanging or tiling reference; manual only for a planned angle; pulse when you have the compatible detection equipment.
With a 4.1 supplied rating, this model does not lead the roundup on feedback, which is why it lands at number ten rather than above the higher-rated Fanttik or CIGMAN. It remains a worthwhile option for shoppers who specifically want a.
Brightness is not outdoor capability
Turning up beam brightness can improve indoor visibility, but direct sunlight will still overwhelm a visible line. Use a compatible receiver in pulse mode for genuine bright-site work.
We earn a commission, at no additional cost to you.
Buying Guide: How to Choose the Best DIY Laser Level
A good beginner choice solves your next few projects without turning setup into another project. Think about where the laser will sit, what you will align, and how much of a room must share the same reference before comparing feature lists.
Start with the job, not the maximum range
For a gallery wall, curtain rod, shelf run, or single tile starter course, a basic horizontal-and-vertical cross-line laser is enough. It gives you an immediate reference and is less intimidating than a multi-plane layout system. The Fanttik D2, Cigman, and both Nikotek models fit this role well.
For a bathroom, kitchen, or closet renovation, you may eventually want 3×360° coverage. It keeps references on several surfaces without constantly moving the laser. That convenience is valuable only when the project needs it; a cross line is simpler, lighter, and usually faster for ordinary decor.
Green versus red: buy visibility for your room
Green lines are normally easier to see indoors, particularly in rooms with daylight or pale walls. That is why most beginner-friendly picks here use green diodes. It does not mean a green laser is automatically more accurate or that it will remain visible outdoors in direct sun.
Red beams can be perfectly useful in controlled light and sometimes offer a more economical, durable package. The Bosch and RockSeed are examples. If your work happens in a bright kitchen at midday, green has the practical edge. If you work in a garage or basement, a red beam may be entirely adequate.
Self-leveling should be simple, not mysterious
A self-leveling tool has a pendulum that finds level when it is placed within a limited tilt range, commonly around 3.5 to 4 degrees in the supplied products. A flashing beam normally means the tool is beyond that range. Reposition the tripod or mount until it becomes steady; do not make marks from a flashing line.
Manual mode is different. It locks the pendulum so you can project a deliberately sloped line, such as for a stair rail. The line may flash as a reminder that it is not level. Beginners should use manual mode only when an angled reference is actually the goal.
A stable mount is worth more than another mode
The most common DIY laser-level failure is not bad calibration—it is a tool that moved after the first mark. A tripod is ideal in an open room. A magnetic bracket is excellent on steel framing, metal shelving, or a compatible metal surface. A solid countertop works for a short, low line; a wobbly stack of books does not.
If you own no compatible mount, select a bundle with a tripod, such as the Motovera or Nikotek kits. If you already own a sturdy 1/4-inch camera tripod, a bare laser can make sense. Check the thread and live bundle contents before ordering.
Think about power between projects
Rechargeable USB-C models like the Fanttik D2 are easy to live with if you charge tools regularly. Replaceable AA battery lasers like the Bosch and Nikotek are reassuring when a project starts after months of storage. Neither approach is universally better; choose the one that matches your actual habits.
A stated runtime is a guide, not a promise for every brightness setting and temperature. Keep fresh batteries or a charging cable available, and switch the tool off during measurement breaks. A dead laser in the middle of an installation encourages rushed, less accurate manual marking.
How to Use a Laser Level for a Weekend DIY Project
1. Decide the reference before you turn the laser on. For a shelf row, determine the desired finished height. For frames, identify the centerline or top edge. Measure that height in two places with a tape so the project has a real-world starting point, not just a floating beam.
2. Put the laser on a stable tripod, magnetic bracket, or firm surface. Spread tripod legs fully and make sure the mount cannot shift when you step back. Place the laser roughly level, unlock its pendulum if required, and wait. A solid line indicates normal self-leveling; a flashing line means it needs to be repositioned.
Frequently Asked Questions
What is the best DIY laser level for a total beginner?
The Motovera 100ft kit is our best starting point because it combines a green cross-line laser with a tripod, so you do not need to solve mounting on day one. The Fanttik D2 is the better choice if compact storage and USB-C charging matter more than an included tripod.
Do I need a green laser level for home DIY?
Not always, but green is generally easier to see in bright indoor rooms. A red laser such as the Bosch GLL50-20 can still be accurate and useful, especially in controlled light. Choose green if daylight visibility is a priority.
Is a self-leveling laser level hard to use?
No. Put it on a stable surface, unlock the pendulum, and wait for the line to settle. If it flashes, the tool is tilted too far to level itself. Move the mount closer to level and wait for a solid line before marking.
What does a flashing laser line mean?
In self-leveling mode, it normally means the laser is outside its leveling range and cannot provide a reliable level reference. In manual or tilt mode, some models flash to remind you that the projected line is intentionally angled. Read the product manual for the exact behavior.
Do I need a tripod with a laser level?
A tripod is highly useful for open rooms, shelves, cabinets, and any project that needs a line at a precise height. You can use a stable surface for a small job, but an included tripod makes a starter kit much easier to use. Make sure it has a compatible 1/4-inch mount.
Can I use a laser level outdoors?
You can, but direct sunlight makes even green beams difficult to see. For serious outdoor work, use pulse mode with a compatible receiver. Many indoor-focused lasers have pulse mode, but the receiver may be sold separately and must be matched to the laser.
Final Thoughts: Choose the Laser You Will Actually Set Up
For a first-time buyer, the best DIY laser level should remove friction, not introduce more of it. The Motovera 100ft kit is our Best Starter Kit because its tripod, green cross line, and straightforward self-leveling behavior cover the jobs most weekend DIYers actually do. The Fanttik D2 is the better everyday companion for compact, rechargeable convenience, while the CIGMAN 3×360° is the sensible upgrade when tiles, cabinets, and whole-room references enter the plan.
Skip the temptation to buy a complicated system just because it advertises more lines. Pick a stable mounting method, learn what the flashing alert means, verify accuracy before permanent work, and use a receiver only when daylight conditions truly require it. Confirm live bundle contents and replace YOURTAG-20 with your affiliate tag before publishing.
